本教程将引导您使用 ISPConfig 自动安装程序安装您自己的 ISPConfig 3 单服务器设置。此安装程序遵循旧的 Perfect Server 指南,但更加模块化且易于遵循。 本指南适用于 Debian 10 和 Ubuntu 20.04。我们将使用主机名server1.example.com。必要时更换它。
1.登录服务器
以 root 身份登录或运行
su -强烈建议运行以下两行命令:
sudo apt-get update
sudo apt-get upgrade
在继续之前成为服务器上的 root 用户。重要提示:您必须使用 ‘su -‘ 而不仅仅是 ‘su’,否则您的 PATH 变量会被 Debian 设置错误。
2.配置主机名和主机
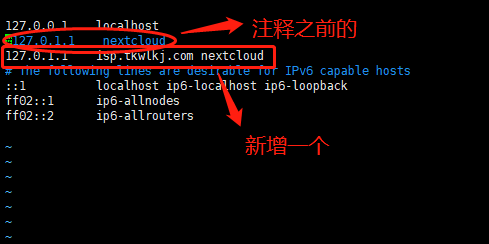
您的服务器的主机名应该是像“server1.example.com”这样的子域。不要使用没有子域部分(如“example.com”)的域名作为主机名,因为这会在以后的设置中导致问题。首先,您应该检查/etc/hosts 中的主机名, 并在必要时进行更改。该行应该是:“IP 地址 – 空格 – 完整主机名,包括域 – 空格 – 子域部分”。对于我们的主机名 server1.example.com,该文件应如下所示(某些行可能不同,每个托管服务提供商可能会有所不同):
vim /etc/hosts127.0.0.1 localhost.localdomain localhost
# This line should be changed to the correct servername:
127.0.1.1 server1.example.com server1
# The following lines are desirable for IPv6 capable hosts
::1 localhost ip6-localhost ip6-loopback
ff02::1 ip6-allnodes
ff02::2 ip6-allrouters上面是示例代码,下面是亲测的截图。

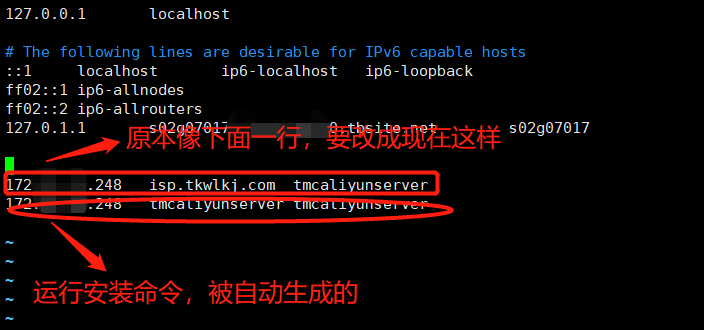
注意:如果你使用的是阿里云,那必须参考下面截图配置Hosts文件!

然后编辑 /etc/hostname 文件:
vim /etc/hostname它应仅包含子域部分,在我们的例子中:
server1上面代码是演示的数据,下面截图是亲测的数据。

*后,重新启动服务器以应用更改:
systemctl reboot再次登录并使用以下命令检查主机名是否正确:
hostname
hostname -f
输出应如下所示:
root@server1:~$ hostname
server1
root@server1:~$ hostname -f
server1.example.com
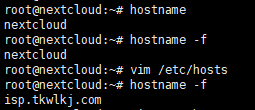
注意:上面的是演示的数据代码,下面的截图是实测的代码。

您还必须与指向您的服务器的 DNS 提供商一起设置 DNS 记录。应该有指向您的公共 IP 的子域的 A(和/或 AAAA)记录。
3. 运行自动安装程序
我们现在可以运行自动安装程序。基本设置包含以下软件包(当然还有它们的依赖项):Apache2、PHP(版本 5.6 – 8.0)、MariaDB、Postfix、Dovecot、Rspamd、BIND、Jailkit、Roundcube、PHPMyAdmin、Mailman、Webalizer、AWStats 和 GoAccess。通过向安装程序传递参数,您可以轻松选择不使用某些功能或安装额外的服务。您可以使用以下命令查看所有参数:
wget -O - https://get.ispconfig.org | sh -s -- --help您现在可以使用参数运行脚本。例如,如果您想要使用被动 FTP + 无人值守升级的端口范围进行正常安装,请运行: (这行代码才是一键安装的!)
wget -O - https://get.ispconfig.org | sh -s -- --use-ftp-ports=40110-40210 --unattended-upgrades注意:您使用上面的命令会不会发现在 Ubuntu20.04 上安装一套 ISPConfig3.2 要2-3个小时?卡在下图截图的步骤不动了?

为了解决这个安装非常慢的问题,费了九牛二虎之力,熬到凌晨出了一个解决方案!
请把上面的安装命令改成:(一般15分钟搞定!)
wget -O - https://www.louishe.com/ispconfig/install.sh | sh -s -- --use-ftp-ports=40110-40210 --unattended-upgrades如果更加精简安装,即不安装绝大多情况下不会用到的DNS和Mail功能,可以使用如下命令:
wget -O - https://www.louishe.com/ispconfig/install.sh | sh -s -- --no-dns --no-mail --use-ftp-ports=40110-40210 --unattended-upgrades顺便告诉你为什么安装如此之慢的原因!
答:如上面一张截图显示的一个步骤,你选了“Yes”(这个也是必须选的,不选进行不下去),这个”yes”,表示ISPConfig自动安装程序会默认把你的源改成德国那边的。想想,你用德国那边的Ubuntu源,那安装速度肯定是快不了的!
一段时间后,你会看到:
WARNING! This script will reconfigure your complete server!
It should be run on a freshly installed server and all current configuration that you have done will most likely be lost!
Type 'yes' if you really want to continue:
回答“是”并按回车键。安装程序现在将启动。
安装程序完成后,它会向您显示 ISPConfig 管理员和 MySQL 根密码,如下所示:
[INFO] Your ISPConfig admin password is: 5GvfSSSYsdfdYC
[INFO] Your MySQL root password is: kkAkft82d!kafMwqxdtYs
请务必记下这些信息,因为稍后您将需要它们。
有时候显示如下的报错:“[ERROR] Exception occured: ISPConfigOSException -> Command add-apt-repository”
参考:https://itsfoss.com/add-apt-repository-command-not-found/

修复 add-apt-repository: command not found 错误
错误很简单。您的系统上未安装软件包 add-apt-repository。
但是,如果您尝试使用 sudo apt-get install add-apt-repository,它将不起作用。
这是因为 添加-apt-repository命令是软件包 software-properties-common 的一部分,您需要安装此软件包才能安装 add-apt-repository。
所以打开一个终端并使用这个命令:
sudo apt-get install software-properties-common命令的输出将是这样的:
Reading package lists... Done
Building dependency tree
Reading state information... Done
The following NEW packages will be installed:
  software-properties-common
0 upgraded, 1 newly installed, 0 to remove and 0 not upgraded.
Need to get 9,912 B of archives.
After this operation, 197 kB of additional disk space will be used.
Get:1 http://us.archive.ubuntu.com/ubuntu bionic-updates/main amd64 software-properties-common all 0.96.24.32.5 [9,912 B]
Fetched 9,912 B in 2s (5,685 B/s)
Selecting previously unselected package software-properties-common.
(Reading database ... 265950 files and directories currently installed.)
Preparing to unpack .../software-properties-common_0.96.24.32.5_all.deb ...
Unpacking software-properties-common (0.96.24.32.5) ...
Processing triggers for man-db (2.8.3-2) ...
Processing triggers for dbus (1.12.2-1ubuntu1) ...
Setting up software-properties-common (0.96.24.32.5) ...
安装 software-properties-common 后,您应该使用以下命令更新系统:
sudo apt-get update您现在可以轻松地使用 add-apt-repository 或 apt-add-repository 命令来添加 PPA。
注意:如果您看到一条错误消息,指出找不到 software-properties-common 命令,您应该运行 sudo apt-get update 然后尝试再次安装它。
我希望这个快速提示可以帮助您修复“add-apt-repository: command not found” 错误 在 Ubuntu 和其他基于 Debian 的 Linux 发行版上。
4. 设置防火墙
*后要做的是设置我们的防火墙。
登录到 ISPConfig UI,然后转到系统 -> 防火墙。然后单击“添加新的防火墙记录”。
对于正常设置,它看起来像这样:
TCP:
20,21,22,25,80,443,40110:40210,110,143,465,587,993,995,53,8080,8081UDP:
53每个服务的必要端口是:
Web:20、21、22、80、443 和 40110:40210(所有 TCP,无 UDP)
邮件:25、110、143、465、587、993 和 995(所有 TCP,无 UDP)
DNS:53(TCP 和 UDP)
面板:8080 和 8081(所有 TCP,无 UDP)
您的服务器现已设置完毕并可供使用。您可以在https://server1.example.com:8080登录
5. *选项
自动安装程序有各种命令行选项来微调设置。例如,您可以在 Apache 和 Nginx 网络服务器之间进行选择,以及系统上应安装哪些服务。命令行参数是:
Usage: ispc3-ai.sh [] [...]

This script automatically installs all needed packages for an ISPConfig 3 setup using the guidelines from the "Perfect Server Setup" howtos on www.howtoforge.com.

Possible arguments are:
    --help          Show this help page
    --debug         Enable verbose logging (logs each command with the exit code)
    --channel       Choose the channel to use for ISPConfig. --channel=<stable|dev>
                    "stable" is the latest ISPConfig release available on www.ispconfig.org
                    "dev" is the latest stable-branch from the ISPConfig git repository: https://git.ispconfig.org/ispconfig/ispconfig3/tree/stable-3.1
                    -> The dev channel might contain bugs and less-tested features and should only be used in production by very experienced users.
    --lang          Use language for ISPConfig installation. Specify with --lang=en|de (only en (English) and de (German) supported currently).
    --interactive   Don't install ISPConfig in non-interactive mode. This is needed if you want to use expert mode, e. g. to install a slave server that shall be integrated into an existing
                    multiserver setup.
    --use-nginx     Use nginx webserver instead of apache2
    --use-amavis    Use amavis instead of rspamd for mail filtering
    --use-unbound   Use unbound instead of bind9 for local resolving. Only allowed if --no-dns is set.
    --use-php       Use specific PHP versions, comma separated, instead of installing multiple PHP, e.g. --use-php=7.4,8.0 (5.6, 7.0, 7.1, 7.2, 7.3, 7.4 and 8.0 available).
                    --use-php=system disables the sury repository and just installs the system's default PHP version.
                    ommiting the argument (use all versions)
    --use-ftp-ports This option sets the passive port range for pure-ftpd. You have to specify the port range separated by hyphen, e. g. --use-ftp-ports=40110-40210.
                    If not provided the passive port range will not be configured.
    --use-certbot   Use Certbot instead of acme.sh for issuing Let's Encrypt certificates. Not adviced unless you are migrating from a old server that uses Certbot.
    --no-web        Do not use ISPConfig on this server to manage webserver setting and don't install nginx/apache or pureftpd. This will also prevent installing an ISPConfig UI and implies
                    --no-roundcube as well as --no-pma
    --no-mail       Do not use ISPConfig on this server to manage mailserver settings. This will install postfix for sending system mails, but not dovecot and not configure any settings for
                    ISPConfig mail. It implies --no-mailman.
    --no-dns        Do not use ISPConfig on this server to manage DNS entries. Bind will be installed for local DNS caching / resolving only.
    --no-local-dns  Do not install local DNS caching / resolving via bind.
    --no-firewall   Do not install ufw and tell ISPConfig to not manage firewall settings on this server.
    --no-roundcube  Do not install roundcube webmail.
    --roundcube     Install Roundcube even when --no-mail is used. Manual configuration of Roundcube config is needed.
    --no-pma        Do not install PHPMyAdmin on this server.
    --no-mailman    Do not install Mailman mailing list manager.
    --no-quota      Disable file system quota
    --no-ntp        Disable NTP setup
    --unattended-upgrades
                    Install UnattendedUpgrades. You can add extra arguments for automatic cleanup and automatic reboots when necessary with --unattended-upgrades=autoclean,reboot (or only
                    one of them).
    --i-know-what-i-am-doing
                    Prevent the autoinstaller to ask for confirmation before continuing to reconfigure the server.
例如,要使用 Nginx 而不是 Apache 安装“完美服务器”,请使用以下命令:
get -O - https://get.ispconfig.org | sh -s -- --use-nginx --use-ftp-ports=40110-40210 --unattended-upgrades或者安装一个没有电子邮件和 DNS 服务的 Nginx Web 服务器:
wget -O - https://get.ispconfig.org | sh -s -- --use-nginx --no-dns --no-mail --use-ftp-ports=40110-40210 --unattended-upgrades6. 总结
您的设置现已完成!
您可以通过购买我们的手册来支持 ISPConfig:https://www.ispconfig.org/documentation/
以下链接是一些有用的教程/指针,可用于进一步设置:
- 设置邮件(rDNS、SPF、DKIM): https:// www.howtoforge.com/how-to-install-an-email-server-with-ispconfig-on-debian-10/
- 调整圆形立方体: https:// www.howtoforge.com/community/threads/tweaking-the-roundcube-settings.86387/
- 设置自动配置(电子邮件客户端的自动配置): https:// schaal-it.com/ispconfig-automail/
- 提高PHPMyAdmin和rspamd接口的安全性: https:// www.howtoforge.com/community/threads/improving-the-security-of-phpmyadmin-and-rspamd-ui.86544/
- ISPConfig 自动安装程序的代码库和问题跟踪器: https:// git.ispconfig.org/thom/ispconfig-autoinstaller
root@nextcloud:~# hostname
nextcloud
root@nextcloud:~# hostname -f
nextcloud
root@nextcloud:~# vim /etc/hosts
root@nextcloud:~# hostname -f
isp.tkwlkj.com
root@nextcloud:~# vim /etc/hosts
root@nextcloud:~# wget -O - https://get.ispconfig.org | sh -s -- --use-ftp-ports=40110-40210 --unattended-upgrades
--2021-10-16 01:23:15--  https://get.ispconfig.org/
Resolving get.ispconfig.org (get.ispconfig.org)... 104.26.10.246, 172.67.75.112, 104.26.11.246, ...
Connecting to get.ispconfig.org (get.ispconfig.org)|104.26.10.246|:443... connected.
HTTP request sent, awaiting response... 200 OK
Length: 2004 (2.0K) [application/octet-stream]
Saving to: ‘STDOUT’
-                          100%[=======================================>]   1.96K  --.-KB/s    in 0s
2021-10-16 01:23:16 (14.3 MB/s) - written to stdout [2004/2004]
WARNING! This script will reconfigure your complete server!
It should be run on a freshly installed server and all current configuration that you have done will most likely be lost!
Type 'yes' if you really want to continue: yes
[INFO] Starting perfect server setup for Ubuntu 20.04.3 LTS
[INFO] Checking hostname.
[INFO] Configuring apt repositories.
[INFO] Updating packages
[INFO] Updated packages
[INFO] Installing packages ssh, openssh-server, nano, vim-nox, lsb-release, apt-transport-https, ca-certificates, wget, git, gnupg, ntp
[INFO] Installed packages ssh, openssh-server, nano, vim-nox, lsb-release, apt-transport-https, ca-certificates, wget, git, gnupg, ntp
[INFO] Activating rspamd repository.
[INFO] Activating sury php repository.
[INFO] Activating GoAccess repository.
[INFO] Updating packages (after enabling 3rd party repos).
[INFO] Updated packages
[INFO] Default shell is currently dash.
[INFO] Setting bash as default shell.
[INFO] Default shell is now bash.
[INFO] Installing packages dbconfig-common, postfix, postfix-mysql, postfix-doc, mariadb-client, mariadb-server, openssl, getmail4, rkhunter, binutils, sudo
[INFO] Installed packages dbconfig-common, postfix, postfix-mysql, postfix-doc, mariadb-client, mariadb-server, openssl, getmail4, rkhunter, binutils, sudo
[INFO] Installing packages dovecot-imapd, dovecot-pop3d, dovecot-mysql, dovecot-sieve, dovecot-managesieved, dovecot-lmtpd
[INFO] Installed packages dovecot-imapd, dovecot-pop3d, dovecot-mysql, dovecot-sieve, dovecot-managesieved, dovecot-lmtpd
[INFO] Generating mySQL password.
[INFO] Writing MySQL config files.
[INFO] Configuring postfix.
[INFO] Restarting postfix
[INFO] Installing packages software-properties-common, dnsutils, resolvconf, clamav, clamav-daemon, clamav-docs, zip, unzip, bzip2, xz-utils, lzip, rar, arj, nomarch, lzop, cabextract, apt-listchanges, libnet-ldap-perl, libauthen-sasl-perl, daemon, libio-string-perl, libio-socket-ssl-perl, libnet-ident-perl, libnet-dns-perl, libdbd-mysql-perl, bind9, spamassassin, rspamd, redis-server, postgrey, p7zip, p7zip-full, unrar-free, lrzip
[INFO] Installed packages software-properties-common, dnsutils, resolvconf, clamav, clamav-daemon, clamav-docs, zip, unzip, bzip2, xz-utils, lzip, rar, arj, nomarch, lzop, cabextract, apt-listchanges, libnet-ldap-perl, libauthen-sasl-perl, daemon, libio-string-perl, libio-socket-ssl-perl, libnet-ident-perl, libnet-dns-perl, libdbd-mysql-perl, bind9, spamassassin, rspamd, redis-server, postgrey, p7zip, p7zip-full, unrar-free, lrzip
[INFO] Stopping Rspamd.
[INFO] (Re)starting Bind.
[INFO] Disabling spamassassin daemon.
WARNING: Ignoring deprecated option SafeBrowsing at /etc/clamav/freshclam.conf:22
ERROR: Problem with internal logger (UpdateLogFile = /var/log/clamav/freshclam.log).
ERROR: initialize: libfreshclam init failed.
ERROR: Initialization error!
[INFO] Checking local dns resolver.
[INFO] Installing packages apache2, apache2-doc, apache2-utils, libapache2-mod-fcgid, apache2-suexec-pristine, libapache2-mod-python, libapache2-mod-passenger
[INFO] Installed packages apache2, apache2-doc, apache2-utils, libapache2-mod-fcgid, apache2-suexec-pristine, libapache2-mod-python, libapache2-mod-passenger
[INFO] Installing packages php-pear, php-memcache, php-imagick, mcrypt, imagemagick, libruby, memcached, php-apcu, jailkit, php5.6, php5.6-common, php5.6-gd, php5.6-mysql, php5.6-imap, php5.6-cli, php5.6-mcrypt, php5.6-curl, php5.6-intl, php5.6-pspell, php5.6-recode, php5.6-sqlite3, php5.6-tidy, php5.6-xmlrpc, php5.6-xsl, php5.6-zip, php5.6-mbstring, php5.6-soap, php5.6-opcache, php5.6-cgi, php5.6-fpm, php7.0, php7.0-common, php7.0-gd, php7.0-mysql, php7.0-imap, php7.0-cli, php7.0-mcrypt, php7.0-curl, php7.0-intl, php7.0-pspell, php7.0-recode, php7.0-sqlite3, php7.0-tidy, php7.0-xmlrpc, php7.0-xsl, php7.0-zip, php7.0-mbstring, php7.0-soap, php7.0-opcache, php7.0-cgi, php7.0-fpm, php7.1, php7.1-common, php7.1-gd, php7.1-mysql, php7.1-imap, php7.1-cli, php7.1-mcrypt, php7.1-curl, php7.1-intl, php7.1-pspell, php7.1-recode, php7.1-sqlite3, php7.1-tidy, php7.1-xmlrpc, php7.1-xsl, php7.1-zip, php7.1-mbstring, php7.1-soap, php7.1-opcache, php7.1-cgi, php7.1-fpm, php7.2, php7.2-common, php7.2-gd, php7.2-mysql, php7.2-imap, php7.2-cli, php7.2-curl, php7.2-intl, php7.2-pspell, php7.2-recode, php7.2-sqlite3, php7.2-tidy, php7.2-xmlrpc, php7.2-xsl, php7.2-zip, php7.2-mbstring, php7.2-soap, php7.2-opcache, php7.2-cgi, php7.2-fpm, php7.3, php7.3-common, php7.3-gd, php7.3-mysql, php7.3-imap, php7.3-cli, php7.3-curl, php7.3-intl, php7.3-pspell, php7.3-recode, php7.3-sqlite3, php7.3-tidy, php7.3-xmlrpc, php7.3-xsl, php7.3-zip, php7.3-mbstring, php7.3-soap, php7.3-opcache, php7.3-cgi, php7.3-fpm, php7.4, php7.4-common, php7.4-gd, php7.4-mysql, php7.4-imap, php7.4-cli, php7.4-curl, php7.4-intl, php7.4-pspell, php7.4-sqlite3, php7.4-tidy, php7.4-xmlrpc, php7.4-xsl, php7.4-zip, php7.4-mbstring, php7.4-soap, php7.4-opcache, php7.4-cgi, php7.4-fpm, php8.0, php8.0-common, php8.0-gd, php8.0-mysql, php8.0-imap, php8.0-cli, php8.0-curl, php8.0-intl, php8.0-pspell, php8.0-sqlite3, php8.0-tidy, php8.0-xsl, php8.0-zip, php8.0-mbstring, php8.0-soap, php8.0-opcache, php8.0-cgi, php8.0-fpm
[INFO] Installed packages php-pear, php-memcache, php-imagick, mcrypt, imagemagick, libruby, memcached, php-apcu, jailkit, php5.6, php5.6-common, php5.6-gd, php5.6-mysql, php5.6-imap, php5.6-cli, php5.6-mcrypt, php5.6-curl, php5.6-intl, php5.6-pspell, php5.6-recode, php5.6-sqlite3, php5.6-tidy, php5.6-xmlrpc, php5.6-xsl, php5.6-zip, php5.6-mbstring, php5.6-soap, php5.6-opcache, php5.6-cgi, php5.6-fpm, php7.0, php7.0-common, php7.0-gd, php7.0-mysql, php7.0-imap, php7.0-cli, php7.0-mcrypt, php7.0-curl, php7.0-intl, php7.0-pspell, php7.0-recode, php7.0-sqlite3, php7.0-tidy, php7.0-xmlrpc, php7.0-xsl, php7.0-zip, php7.0-mbstring, php7.0-soap, php7.0-opcache, php7.0-cgi, php7.0-fpm, php7.1, php7.1-common, php7.1-gd, php7.1-mysql, php7.1-imap, php7.1-cli, php7.1-mcrypt, php7.1-curl, php7.1-intl, php7.1-pspell, php7.1-recode, php7.1-sqlite3, php7.1-tidy, php7.1-xmlrpc, php7.1-xsl, php7.1-zip, php7.1-mbstring, php7.1-soap, php7.1-opcache, php7.1-cgi, php7.1-fpm, php7.2, php7.2-common, php7.2-gd, php7.2-mysql, php7.2-imap, php7.2-cli, php7.2-curl, php7.2-intl, php7.2-pspell, php7.2-recode, php7.2-sqlite3, php7.2-tidy, php7.2-xmlrpc, php7.2-xsl, php7.2-zip, php7.2-mbstring, php7.2-soap, php7.2-opcache, php7.2-cgi, php7.2-fpm, php7.3, php7.3-common, php7.3-gd, php7.3-mysql, php7.3-imap, php7.3-cli, php7.3-curl, php7.3-intl, php7.3-pspell, php7.3-recode, php7.3-sqlite3, php7.3-tidy, php7.3-xmlrpc, php7.3-xsl, php7.3-zip, php7.3-mbstring, php7.3-soap, php7.3-opcache, php7.3-cgi, php7.3-fpm, php7.4, php7.4-common, php7.4-gd, php7.4-mysql, php7.4-imap, php7.4-cli, php7.4-curl, php7.4-intl, php7.4-pspell, php7.4-sqlite3, php7.4-tidy, php7.4-xmlrpc, php7.4-xsl, php7.4-zip, php7.4-mbstring, php7.4-soap, php7.4-opcache, php7.4-cgi, php7.4-fpm, php8.0, php8.0-common, php8.0-gd, php8.0-mysql, php8.0-imap, php8.0-cli, php8.0-curl, php8.0-intl, php8.0-pspell, php8.0-sqlite3, php8.0-tidy, php8.0-xsl, php8.0-zip, php8.0-mbstring, php8.0-soap, php8.0-opcache, php8.0-cgi, php8.0-fpm
[INFO] Disabling conflicting apache modules.
[INFO] Enabling apache modules.
[INFO] Enabling default PHP-FPM config.
[INFO] Setting default system php version.
[INFO] Installing packages phpmyadmin
[INFO] Installed packages phpmyadmin
[INFO] HTTPoxy config.
[INFO] Installing acme.sh (Let's Encrypt).
[INFO] acme.sh (Let's Encrypt) installed.
[INFO] Installing Mailman
[INFO] Installing packages mailman
[INFO] Installed packages mailman
[INFO] Installing packages quota, quotatool, haveged, geoip-database, libclass-dbi-mysql-perl, libtimedate-perl, build-essential, autoconf, automake, libtool, flex, bison, debhelper, binutils
[INFO] Installed packages quota, quotatool, haveged, geoip-database, libclass-dbi-mysql-perl, libtimedate-perl, build-essential, autoconf, automake, libtool, flex, bison, debhelper, binutils
[INFO] Adding quota to fstab.
[INFO] Installing packages pure-ftpd-common, pure-ftpd-mysql, webalizer, awstats, goaccess
[INFO] Installed packages pure-ftpd-common, pure-ftpd-mysql, webalizer, awstats, goaccess
[INFO] Enabling TLS for pureftpd
[INFO] Disabling awstats cron.
[INFO] Installing packages fail2ban, ufw
[INFO] Installed packages fail2ban, ufw
[INFO] Installing UnattendedUpgrades
[INFO] Installing packages unattended-upgrades, apt-listchanges
[INFO] Installed packages unattended-upgrades, apt-listchanges
[INFO] Installing roundcube.
[INFO] Installing packages roundcube, roundcube-core, roundcube-mysql, roundcube-plugins
[INFO] Installed packages roundcube, roundcube-core, roundcube-mysql, roundcube-plugins
[INFO] Installing ISPConfig3.
[INFO] Adding php versions to ISPConfig.
[INFO] Checking all services are running.
[INFO] mysql: OK
[INFO] clamav-daemon: FAILED
[WARN] clamav-daemon seems not to be running! (/lib/os/class.ISPConfigDebianOS.inc.php:1379)
[INFO] postfix: OK
[INFO] bind9: OK
[INFO] pureftpd: OK
[INFO] apache2: OK
[INFO] rspamd: OK
[INFO] redis-server: OK
[INFO] dovecot: OK
[INFO] Installation ready.
[INFO] Your Mailman password is: hMfp5VBJRLPh
[INFO] Your ISPConfig admin password is: tu6EQ9ZPFppfrG7
[INFO] Your MySQL root password is: bvGGncTJdog4nn4x8gGF
[INFO] Warning: Please delete the log files in /tmp/ispconfig-ai/var/log/setup-* once you don't need them anymore because they contain your passwords!
