本教程介绍了将 ISPConfig 3.1 服务器更新到 ISPConfig 3.2 的步骤。本教程兼容 CentOS、Debian 和 Ubuntu 操作系统。
检查 ISPConfig 3.2 系统要求
ISPConfig 3.2 兼容以下操作系统版本:
- CentOS 7
- CentOS 8
- Debian 9
- Debian 10
- Ubuntu 16.04 LTS
- Ubuntu 18.04 LTS
- Ubuntu 20.04 LTS
ISPConfig 3.2 是否适用于较旧的操作系统?
如果安装的默认 PHP 版本是 min,它可能会起作用。PHP 5.4。我们没有测试旧版本,当配置文件包含可能在不受支持的操作系统上使用的旧软件版本不支持的设置时,您可能需要手动调整配置文件。
安装新的软件依赖项
ISPConfig 3.2 中的某些功能需要额外的软件。应在开始更新之前安装此软件。
对于 Debian 和 Ubuntu
sudo apt-get install bzip2 p7zip-full xz-utils lzip rar unrar-free goaccess dovecot-lmtpd注意: rar 和 unrar-free 包在 ARM 架构上不可用。这意味着网站备份的 rar 模式将不起作用,其他功能不受影响。
对于 CentOS 7
sudo yum -y install ncurses-devel gcc geoip-devel tokyocabinet-devel lbzip2 p7zip xz-libs lzip
cd /tmp
wget http://tar.goaccess.io/goaccess-1.4.tar.gz
tar xfz goaccess-1.4.tar.gz
cd goaccess-1.4
sudo ./configure --enable-utf8 --enable-geoip=legacy
sudo make
sudo make install
sudo ln -s /usr/local/bin/goaccess /usr/bin/goaccess
对于 CentOS 8
dnf install ncurses-devel gcc geoip-devel tokyocabinet-devel lbzip2 p7zip p7zip-plugins xz-libs lzip
cd /tmp
wget http://tar.goaccess.io/goaccess-1.4.tar.gz
tar xfz goaccess-1.4.tar.gz
cd goaccess-1.4
sudo ./configure --enable-utf8 --enable-geoip=legacy
sudo make
sudo make install
sudo ln -s /usr/local/bin/goaccess /usr/bin/goaccess
CentOS 7 和 8
centOS 或 Epel 存储库上的 CentOS 没有免费的 rar 包,只有来自 rarlab 的试用版。如果你仍然想安装它,这里是安装步骤。Rar 是可选的,仅用作网站备份的存档选项。当您不安装它时,那么仅 rar 作为备份格式选项将不起作用。
cd /tmp
wget https://www.rarlab.com/rar/rarlinux-x64-5.9.1.tar.gz
tar -zxvf rarlinux-x64-5.9.1.tar.gz
cd rar
sudo cp -v rar unrar /usr/local/bin/
检查自定义配置文件模板
ISPConfig 支持存储在文件夹/usr/local/ispconfig/server/conf-custom/ 中的自定义配置文件模板。如果您在那里创建了任何配置模板,那么它们很可能与 ISPConfig 3.2 不兼容。删除它们(推荐)或根据 ISPConfig 3.2 附带的配置文件创建新的。
您可以使用以下命令检查是否有自定义配置文件:
ls -la /usr/local/ispconfig/server/conf-custom/如果结果是这样,那么您没有任何自定义配置文件模板:
[root@server1 tmp]# ls -la /usr/local/ispconfig/server/conf-custom/
total 8
drwxr-x---.  6 root root   76 Oct  1 00:02 .
drwxr-x---. 13 root root 4096 Oct  1 00:02 ..
-rwxr-x---.  1 root root   45 Oct  1 00:02 empty.dir
drwxr-x---.  2 root root   23 Oct  1 00:02 error
drwxr-x---.  2 root root   23 Oct  1 00:02 index
drwxr-x---.  2 root root   23 Oct  1 00:02 install
drwxr-x---.  2 root root   23 Oct  1 00:02 mail
所以在这种情况下没有什么可做的。
接下来,检查安装文件夹:
ls -la /usr/local/ispconfig/server/conf-custom/install/以下结果显示没有任何自定义模板的空文件夹:
[root@server1 tmp]# ls -la /usr/local/ispconfig/server/conf-custom/install/
total 4
drwxr-x---. 2 root root 23 Oct  1 00:02 .
drwxr-x---. 6 root root 76 Oct  1 00:02 ..
-rwxr-x---. 1 root root 45 Oct  1 00:02 empty.dir
所以这里没有需要删除或调整的自定义模板。
让我们为 ISPConfig 端口 8080、Postfix、Dovecot 和 pure-ftpd 加密
如果您为 ISPConfig 虚拟主机和诸如 postfix、dovecot 和 pure-ftpd 之类的服务手动配置了 Let’s Encrypt 证书,那么这可能与 ISPConfig 为这些服务提供的新 Let#s 加密功能冲突。当 ISPConfig 更新程序询问是否应重新创建 SSL 证书时,通过选择“否”来保留旧的 let#s 加密设置,或者注意删除您可能已安装的任何自定义 Let’s encrypt 更新脚本,这些脚本可能会干扰新功能在 ISPConfig 中。
将 ISPConfig 3.1 更新到 3.2
现在我们可以开始更新过程了。更新需要以 root 用户身份运行,对于 Debian,请使用:
su -成为root用户。
对于 CentOS 和 Ubuntu,请使用:
sudo -s成为root
然后使用以下命令启动 ISPConfig 更新:
ispconfig_update.sh在屏幕上出现的对话框中选择“ stable ”作为更新源:

注意:可用的更新选项因您的旧 ISPConfig 版本而异。但总有一个名为stable的选项。
更新过程会问几个问题,如下所示。我用红色突出显示了推荐的答案。
--------------------------------------------------------------------------------
 _____ ___________   _____              __ _         ____
|_   _/  ___| ___ \ /  __ \            / _(_)       /__  \
  | | \ `--.| |_/ / | /  \/ ___  _ __ | |_ _  __ _    _/ /
  | |  `--. \  __/  | |    / _ \| '_ \|  _| |/ _` |  |_ |
 _| |_/\__/ / |     | \__/\ (_) | | | | | | | (_| | ___\ \
 \___/\____/\_|      \____/\___/|_| |_|_| |_|\__, | \____/
                                              __/ |
                                             |___/
--------------------------------------------------------------------------------


>> Update

Operating System: Ubuntu 20.04.1 LTS (Focal Fossa)

This application will update ISPConfig 3 on your server.

Shall the script create a ISPConfig backup in /var/backup/ now? (yes,no) [yes]: yes

Creating backup of "/usr/local/ispconfig" directory...
Creating backup of "/etc" directory...
Checking ISPConfig database .. OK
Starting incremental database update.
Loading SQL patch file: /tmp/ispconfig3_install/install/sql/incremental/upd_dev_collection.sql
Reconfigure Permissions in master database? (yes,no) [no]: <-- On multiserver systems, choose yes, on single server systems, choose no.

Reconfigure Services? (yes,no,selected) [yes]: yes

Configuring Postfix
Configuring Dovecot
Configuring Mailman
Configuring Spamassassin
Configuring Amavisd
Configuring Getmail
Configuring BIND
Configuring Pureftpd
Configuring Apache
Configuring vlogger
Configuring Apps vhost
Configuring Jailkit
Configuring Ubuntu Firewall
Configuring Database
Updating ISPConfig
ISPConfig Port [8080]: <-- just hit return to accept the default

Create new ISPConfig SSL certificate (yes,no) [no]: <-- Choose no to keep existing SSL cert, choose yes to create new SSL cert or switch from self-signed to a Let's encrypt SSL certificate.

Reconfigure Crontab? (yes,no) [yes]: yes

Updating Crontab
Restarting services ...
Update finished.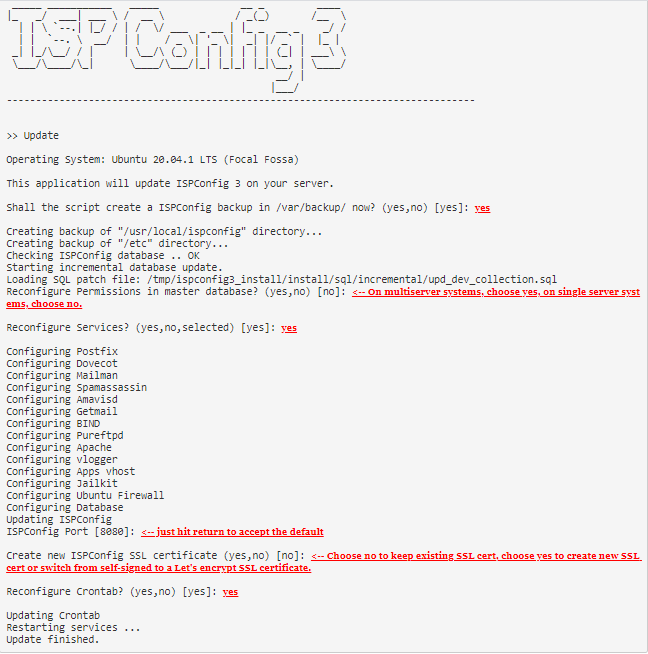
当您看到其他一些“配置…”行时不要担心,实际结果取决于您服务器的软件设置。
需要更新帮助?
如果您在更新方面需要任何帮助,如果您对更新过程有任何其他问题,或者如果您在更新系统后遇到问题,请在 ISPConfig 支持论坛中的 howtoforge 上发帖描述您的问题:
https://www.howtoforge.com/community/forums/installation-configuration.27/
对于个别支持问题,请不要使用本文下方的评论功能。
出了点问题,您想恢复到以前的设置吗?
ISPConfig 更新程序会创建整个/etc目录(所有配置文件)、目录/usr/local/ispconfig(整个以前的 ISPConfig 安装)和 ISPConfig dbispconfig MySQL/MariaDB 数据库的备份。备份可以在文件夹 /var/backup/ 中找到,有一个以“ispconfi_”开头的子文件夹,加上服务器主机名和更新日期。例子:
[root@server1 ~]# ls /var/backup/
ispconfig_server1.example.com_2020-10-15_19-38
此文件夹包含文件备份为 tar.gz 文件和 SQL 转储:
[root@server1 ~]# ls /var/backup/ispconfig_server1.example.com_2020-10-15_19-38/
etc.tar.gz  ispconfig_db_backup.sql  ispconfig_software.tar.gz