有时候你需要自己制作一个文章列表页翻页功能。
那么在 WordPress 中如何实现分类导航,有三种办法:
- 使用内置的函数
- 自定义导航样式(自己编写函数)
- 使用wordpress插件
1、使用内置函数
the_posts_pagination()函数可以用在文章列表之后:
<?php
get_header();
?>

<?php
$args = array(
    'cat' => $cat,
    'paged' => $paged,
    'posts_per_page' => 2,
);

$wp_query = new WP_Query($args);

if ($wp_query->have_posts()):
    while ($wp_query->have_posts()):$wp_query->the_post();
        the_title('<li>','</li>');
    endwhile;
endif;

the_posts_pagination(); //显示分页导航

wp_reset_postdata();
?>

<?php
get_footer();来源于:wp-includes/link-template.php
function the_posts_pagination( $args = array() ) {
	echo get_the_posts_pagination( $args );
}
但是*终来源于get_the_posts_pagination:wp-includes/link-template.php
参考链接:https://developer.wordpress.org/reference/functions/get_the_posts_pagination/
function get_the_posts_pagination( $args = array() ) {
	global $wp_query;

	$navigation = '';

	// Don't print empty markup if there's only one page.
	if ( $wp_query->max_num_pages > 1 ) {
		// Make sure the nav element has an aria-label attribute: fallback to the screen reader text.
		if ( ! empty( $args['screen_reader_text'] ) && empty( $args['aria_label'] ) ) {
			$args['aria_label'] = $args['screen_reader_text'];
		}

		$args = wp_parse_args(
			$args,
			array(
				'mid_size'           => 1,
				'prev_text'          => _x( 'Previous', 'previous set of posts' ),
				'next_text'          => _x( 'Next', 'next set of posts' ),
				'screen_reader_text' => __( 'Posts navigation' ),
				'aria_label'         => __( 'Posts' ),
				'class'              => 'pagination',
			)
		);

		/**
		 * Filters the arguments for posts pagination links.
		 *
		 * @since 6.1.0
		 *
		 * @param array $args {
		 *     Optional. Default pagination arguments, see paginate_links().
		 *
		 *     @type string $screen_reader_text Screen reader text for navigation element.
		 *                                      Default 'Posts navigation'.
		 *     @type string $aria_label         ARIA label text for the nav element. Default 'Posts'.
		 *     @type string $class              Custom class for the nav element. Default 'pagination'.
		 * }
		 */
		$args = apply_filters( 'the_posts_pagination_args', $args );

		// Make sure we get a string back. Plain is the next best thing.
		if ( isset( $args['type'] ) && 'array' === $args['type'] ) {
			$args['type'] = 'plain';
		}

		// Set up paginated links.
		$links = paginate_links( $args );

		if ( $links ) {
			$navigation = _navigation_markup( $links, $args['class'], $args['screen_reader_text'], $args['aria_label'] );
		}
	}

	return $navigation;
}
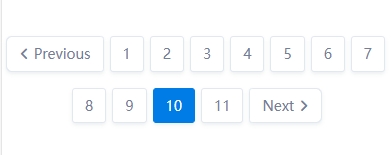
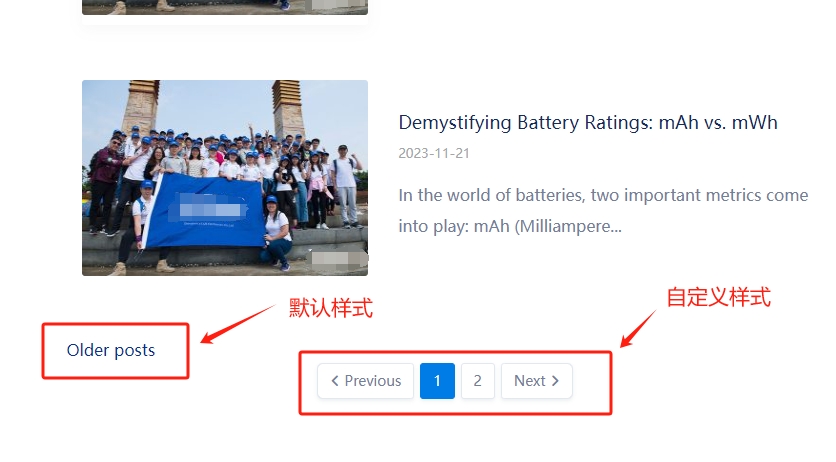
默认样式效果不理想,基本不会被采用,下图分别是自定义样式和系统默认的样式比较:
the_posts_pagination() 也可以使用参数
the_posts_navigation( array(

	'mid_size'           => 1,
	'prev_text'          => _x( 'Previous', 'previous set of posts' ),
	'next_text'          => _x( 'Next', 'next set of posts' ),
	'screen_reader_text' => __( 'Posts navigation' ),
	'aria_label'         => __( 'Posts' ),
	'class'              => 'pagination',

    ) );
2、自定义WordPress的列表翻页功能:
在WordPress文章列表页添加翻页功能通常是默认启用的,但如果你想自定义翻页的样式或者确保翻页正常工作,你可以按照以下步骤进行操作:
找到并点击编辑index.php或archive.php文件,这是文章列表页的主要模板文件之一。如果这两个文件都不存在,你可以查找其他可能包含文章列表的文件。
在适当的位置,通常是在文章列表循环的下方,添加你自己编写的翻页HTML。以下是一个简单的例子:
<!-- Page Navigation-->
<div class="row">
    <div class="col-md-12">
        <nav>
            <ul class="pagination justify-content-center">

            <?php
            $total_pages = $wp_query->max_num_pages;
            $current_page = max(1, get_query_var('paged'));

            // 上一页
            echo '<li class="page-item ' . ($current_page === 1 ? 'disabled' : '') . '"><a href="' . esc_url(get_pagenum_link($current_page - 1)) . '" class="page-link"><span class="fas fa-angle-left"></span> Previous</a></li>';

            // 生成页码链接
            for ($i = 1; $i <= $total_pages; $i++) {
                $active_class = ($i === $current_page) ? 'active' : '';
                echo '<li class="page-item ' . $active_class . '"><a href="' . esc_url(get_pagenum_link($i)) . '" class="page-link ' . $active_class . '">' . $i . '</a></li>';
            }

            // 下一页
            echo '<li class="page-item ' . ($current_page >= $total_pages || $total_pages == 0 ? 'disabled' : '') . '"><a href="' . esc_url(get_pagenum_link($current_page + 1)) . '" class="page-link">Next <span class="fas fa-angle-right"></span></a></li>';
            ?>

            </ul>
        </nav>
    </div>
</div>
<!-- Page Navigation end-->
上述代码通过循环生成翻页链接,每个链接都包含页码,并且当前页码会被标记为活动状态。通过这种方式,你完全可以自定义翻页的HTML结构和样式,而不依赖于默认的WordPress翻页函数。
我使用了 $current_page >= $total_pages || $total_pages == 0 条件来判断是否是*后一页。这样可以确保在总页数为零时也禁用下一页按钮。
备注:不使用上面的判断,会导致*后“Next”一直处于激活状态,当处于*后一页的时候,点击会报404错误。
上述代码中,我添加了上一页和下一页的链接,并在需要时加上了 disabled 类以禁用它们(在*页和*后一页时)。你可以根据需要进一步调整样式和结构。在 prev 和 next 类中,你可以加入适当的图标或其他文本以表示上一页和下一页。在 disabled 类中,你可以设置一种样式以指示链接不可用状态。
但是,移动端样式出问题
上面的代码移动端显示的时候,如果出现20几页的翻页的时候,页码标签不会换行,会把前几页和后几页撑开到屏幕以外显示,这种显然不可行。原因是使用的“.pagination”导致的,它原生的一个“display: flex”会导致这个问题。
下面是纠正之后的代码:
<!-- Page Navigation-->
<div class="row justify-content-center mb-5">

    <nav>
        <ul class="pagination">

            <?php
            $total_pages = $wp_query->max_num_pages;
            $current_page = max(1, get_query_var('paged'));

            echo '<li class="page-item mb-3' . ($current_page === 1 ? 'disabled' : '') . '"><a href="' . esc_url(get_pagenum_link($current_page - 1)) . '" class="page-link"><span class="fas fa-angle-left"></span> Previous</a></li>';

            for ($i = 1; $i <= $total_pages; $i++) {
                $active_class = ($i === $current_page) ? 'active' : '';
                echo '<li class="page-item ' . $active_class . '"><a href="' . esc_url(get_pagenum_link($i)) . '" class="page-link ' . $active_class . '">' . $i . '</a></li>';
            }

            echo '<li class="page-item ' . ($current_page >= $total_pages || $total_pages == 0 ? 'disabled' : '') . '"><a href="' . esc_url(get_pagenum_link($current_page + 1)) . '" class="page-link">Next <span class="fas fa-angle-right"></span></a></li>';
            ?>

        </ul>
    </nav>

</div>
<!-- Page Navigation end-->
还要写一个样式:
    .pagination{
        flex-wrap: wrap;
        justify-content: center;
    }
*终的效果如下: